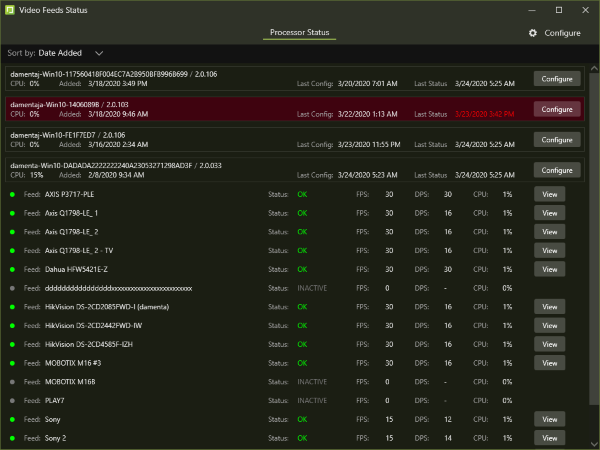
Video Feeds Status Window
This window allows you to view and configure your video feeds. Any feed that’s highlighted in red is currently inactive.

The video feeds can be sorted by one of the following criteria:
- Date Added: Sort the feeds based on the date when they were added.
- Status Date: Sort the feeds based on the date when the feeds’ status last changed.
- Client Id: Sort the feeds based on the Id’s of the clients to which the feeds are connected.
- Tenant: Sort the feeds based on the feeds’ tenants.
- Version: Sort the feeds based on the feeds’ version.
You can click on the Configure button to the right of a feed to configure it. Similarly, you can click on the View button the right of a camera to see a live video view of the camera.
Add a VIRGO Daemon
To add a VIRGO daemon, there must be at least one active video feed connected to this Desktop client. See Connect Cameras to SAFR for information about how to connect cameras to the client.
Note: You can’t add a VIRGO daemon to a video feed that is currently being displayed by the Camera Feed Analyzer. To add a VIRGO daemon, do the following:
- Click the Configure button on the active video feed that you want to associate the VIRGO daemon with.
- Hover your mouse over the feeds entry. You’ll see a + button and a - button. Click the + button. You’ll be prompted for the following information:
- Feed Name: Enter any name for the video feed you wish.
- Camera: Select the camera that is providing the video feed.
- Mode: Select the video processing mode that you want the VIRGO daemon to operate in. For a description of the video processing modes, see here.
- Apply Mode Customizations from Preferences: Enable if you want the Desktop client preferences applied to the new VIRGO daemon.
- Press the Add button. The VIRGO daemon has been created. Note: At this point, the VIRGO daemon exists independently of both the Desktop client and the video feed that you cloned to create the daemon.