Occupancy Dashboard
Only available on Windows.
The Occupancy Dashboard is used to monitor how many people are within a certain physical space. The dashboard uses SAFR’s direction of travel recognition feature, so you must be using a Visual Processing Mode that captures events, and the camera(s) that the dashboard uses should be positioned such that people are either moving directly away, directly towards, directly to the left, or directly to the right of the camera. See here for additional information about the direction of travel recognition.
In addition, the following preferences must be set for the Occupancy Dashboard to work:
- Events must be enabled in the Desktop client’s Events Preferences menu.
- Face detection and person detection must be enabled in the Desktop client’s Detection Preferences menu. If person detection isn’t enabled, then anybody whose face can’t be seen (e.g. only the back of their head is visible) won’t be counted.
- Age and/or mask detection must be enabled in the
Detectsection of the Desktop client’s Recognition Preferences menu for those sections of the Occupancy Dashboard to be populated.
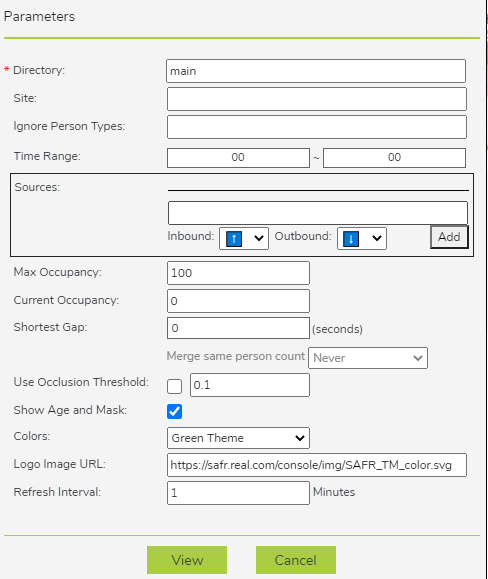
Input Parameters

- Directory: User directory from which to run the dashboard.
- Site: Filter that allows you to limit the report to cameras with the specified site value. Site values can be set using the Account Preferences tab within the Desktop client.
- Ignore Person Types: Specifies the Person types, if any, that the Occupancy Dashboard should ignore and not count.
- Time Range: Specifies the time range that the dashboard covers. Note that this dashboard can cover no more than 24 hours.
- Sources: Specifies which cameras to use to monitor occupancy. The cameras use SAFR’s direction of travel recognition feature (described in detail here). The arrows next to Inbound and Outbound represent the camera direction that corresponds to entering or leaving the monitored space. Note that although direction of travel recognition defaults to 10%, we recommend that you go to your Desktop client’s Camera Preferences menu and change the values to 40%.
- Max Occupancy: The maximum occupancy of the space you want to monitor.
- Current Occupancy: The current number of people in the space you want to monitor.
- Shortest Gap: If a person is viewed by a camera (thus triggering an event), leaves the field of view of the camera, and is then seen by the camera again (thus triggering another event), the two events will be merged into a single event if the time between them is equal to or less than the number of seconds specified by the Shortest Gap parameter.
- Merge same person count: This is a field to help you calculate the Shortest Gap parameter. You can select a value from the drop-down menu, and the correct number of seconds will be calculated and entered into the Shortest Gap field.
- Use Occlusion Threshold: Specifies if occlusion detection is enabled for the Occupancy Dashboard. If enabled, the numerical value indicates the maximum occlusion value allowed for a face to be recognized. When this setting is set to 1, no occlusion filtering is applied.
Note: Occlusion detection must also be enabled in theDetectsection on the Desktop client’s Recognition Preferences menu. - Show Age and Mask: Specifies if age and mask information will be included on the dashboard.
Note: Age and/or mask detection must also be enabled in theDetectsection on the Desktop client’s Recognition Preferences menu. In addition, the previous parameter, Use Occlusion Threshold, must be enabled for mask information to be included in the Occupancy Dashboard. - Colors: Specifies which color scheme will be used for the dashboard. There are two options: Blue Theme and Green Theme.
- Logo Image URL: Use this to use a custom logo in place of the SAFR logo at the top of the trend chart.
- Refresh Interval: Specifies how frequently the data on the dashboard is refreshed. If “0” is entered, the dashboard won’t work. If you want a very quick refresh time, enter a very small non-zero number such as 0.1.
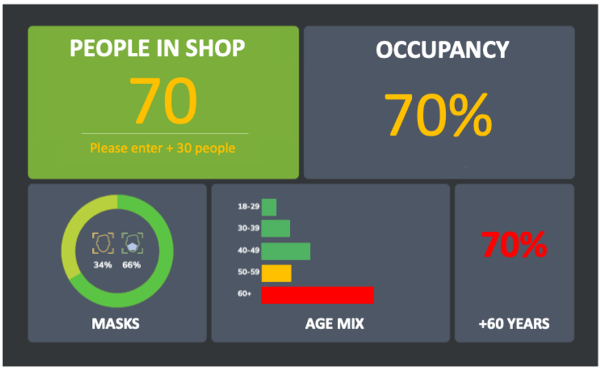
Generated Dashboard
Below is a sample Occupancy Dashboard.
